What are the four ways to install Windows on a Mac?
If you are Mac fan then you are aware that Mac gives you the choice of either running the macOS on its own, or installing Windows for those occasions when you need to run specific Windows app or play pokies games that might not normally be available for the Mac. Here we bring for you the four ways to install Windows on a Mac as expert Cliff Joseph explained in Mac World digital site.
The four ways to install windows on a Mac is by using Apple’s own dual-booting Boot Camp Assistant and then with third-party virtualisation software like VMWare, Parallels and VirtualBox.
About Boot Camp Assistant

The Boot Camp Assistant is an app provided by Apple that helps you to install Windows on your Mac. You’ll find the Assistant located in the Utilities folder within the main Applications folder on your Mac – but before you run the Assistant there are a few things that you should check first.
Apple recommends that you have a minimum of 55GB of free storage available on your Mac’s internal hard drive for installing Windows, along with a USB memory stick with at least 16GB of storage for the additional ‘driver’ software that Windows needs in order to control components such as your Mac’s monitor and camera, as well as your Mac keyboard and mouse.
Also you’ll need a fully paid-for copy of Windows, along with the licence number. Some recent Mac models will only work with Windows 10, although older models may also work with Windows 7, or Windows 8.1. You can check which versions of Windows your Mac can run on Apple’s website.
The installation process will also vary, depending on which version of Windows you’re using. If you’re using Windows 10 then you’ll need to download it as a ‘disk image’ file – sometimes also called an ‘ISO file’ – from Microsoft’s website.
You can download ISO files for Windows 7 and Windows 8.1 also. However, these versions of Windows were originally sold on disk, so if you still have the original disk then it’s probably quicker to create the ISO file using the installer program on the disk. This is actually quite straightforward, and Apple covers this option on its website too.
Running Boot Camp

Once you’ve completed those preparations you’ll be ready to run the Boot Camp Assistant and install Windows on your Mac.
When you run the Boot Camp Assistant for the first time, it will prompt you with a number of options. The first option is simply to confirm that you want to ‘Create a Windows 7 or later install disk’. This will copy your Windows ISO file on to the USB memory stick so that you can install Windows.
When you select this option, the Boot Camp Assistant also tells you that it will download the driver software for Windows on to the USB memory stick as well. However, it will only download the drivers for Windows 8.1 and Windows 10, so if you want to install Windows 7 – which is still used by millions of people around the world – then you’ll have to head back to the compatibility tables on Apple’s website in order to locate the driver software that you need for your Mac and then follow the instructions to copy the drivers on to your USB memory stick.
If this is your first time using Boot Camp then, then, you’ll also need to select the option to ‘Install Windows 7 or later’. This will allow you to split – or ‘partition’ – your Mac’s hard drive into two separate sections, known as ‘partitions’. The normal macOS is left on one partition, while the second partition is used to install Windows and any other Windows software and apps that you want to use.
By default, the Boot Camp Assistant offers to create a small Windows partition that is only 32GB in size, but you can use the slider control to adjust the size of the two partitions as required. There’s also a simple button that will simply split the drive into two partitions of equal size.

If your Mac has more than one internal hard drive or SSD then it is possible to devote one of those drives exclusively to Windows. However, Boot Camp doesn’t play well with external drives connected via USB or Thunderbolt, so it’s best to use your normal internal drive wherever possible. Note that if you have an external drive connected to your Mac for Time Machine backups then better remove it as Boot Camp can get a bit confused if it detects an external drive during installation.
Once you’ve partitioned your Mac drive, Boot Camp will shut down your Mac and launch the Windows installer program from the USB memory stick. You can just follow the prompts to install Windows. As soon as Windows starts up you will also be prompted to install the additional Boot Camp drivers from the memory stick as well.
When that’s done you can simply ‘dual-boot’ between the macOS and Windows by pressing Alt on your keyboard when you turn the Mac on. You’ll see the two partitions with the macOS and Windows displayed on screen as the Mac starts up, and you can simply select whichever operating system you need.
Well this was the way you need to install Boot Camp Assistant before you begin. Also you need to know that any recent Mac device should be able to run Windows 10. But still if you need to know which Macs can run Windows then look at the complete list here.
1. Installing Windows 10 with Boot Camp
As Apple itself provides this key to install Windows with the Boot Camp Assistant that is installed on every Mac as said above, is called ‘dual-booting’, as it gives you the ability to start up or ‘boot’ your Mac using either Windows or the macOS. The Boot Camp Assistant can split your Mac’s hard drive or solid state drive into two sections – called ‘partitions’. It leaves the macOS on one partition, and then installs Windows on the second partition, and then you simply choose which operating system you want to run by pressing the Alt key on your keyboard when you ‘boot’ your Mac.
Installing Windows on a Boot Camp partition with this method effectively turns your Mac into a straightforward Windows PC, and devotes all of your Mac’s processor power and memory – and its graphics card if it has one – to running Windows alone. That’s the best option if you want to play Windows pokies games, or run high-end graphics and design software that needs all the power it can get.
2. Install Windows using Virtualisation
On the other hand note that with Boot Camp windows installation you can lose access to all your normal Mac apps while you’re running Windows, which means that you have to shut down Windows and boot back into the macOS if you want to use Mac apps such as Apple Mail or Photos.
So what you need to do is try installing Windows with other option known as ‘virtualisation’ where instead of splitting your hard drive into separate partitions for macOS and Windows, you use a virtualisation program such as Parallels Desktop or VMWare Fusion to create a ‘virtual machine’ that runs within the macOS itself.
The virtual machine (VM) is simply an app that runs on the Mac just like any other Mac app. However, the virtual machine mimics the workings of a PC, allowing you to install Windows on the virtual machine, and then install any Windows apps that you need to run as well. Thus you can run your Windows apps on the Mac desktop right alongside all your normal Mac apps, so there’s no need to dual-boot back and forth between the macOS and Windows as you do when running Boot Camp.
On the downside running Windows within a virtual machine means that you’re effectively running two operating systems at the same time, so you’re going to need plenty of processor power and memory to get decent performance when running your Windows apps. Even so, most recent Macs can still provide good performance when running Windows in a virtual machine, and it’s only 3D games and high-end graphics apps that need the extra power you can get from dual-booting with Boot Camp.
3. Installing Windows with Parallels & VMWare
Virtualisation programmes such as Parallels Desktop and VMware Fusion provide an ingenious and flexible alternative to the dual-boot approach of Boot Camp. Instead of splitting your Mac’s hard drive into separate partitions, and then installing Windows on to the Boot Camp partition, these programs create a ‘virtual machine’ – or VM – which is simply an app that runs on the Mac and acts like a PC. You can then install Windows on the VM, along with whatever Windows apps and software that you need to run. The VM can run alongside other Mac apps, such as Safari or Apple Mail, so there’s no need to switch back and forth between the two operating systems, as you are forced to do with Boot Camp.
Note that these programs aren’t free, and you’ll need to buy a copy of the program you prefer, as well as providing your own copy of Windows although both Parallels and VMWare do provide trial versions that you can look at to see which one you prefer. There is a free virtualisation program, called Virtual Box, but it’s fairly complex and difficult to use.
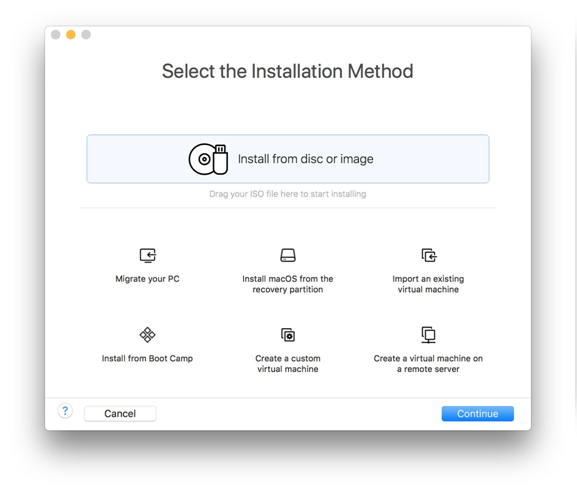
To use Parallels and VMWare to install Windows go to the VirtualBox section if you feel ready for the challenge. Parallels Desktop 13 has a more colourful graphical interface than VMWare Fusion 10, but the two programs take the same basic approach. They provide several options for creating a new VM on your Mac, using an installer disk, or ISO file.

It’s also possible to connect an existing Windows PC to your Mac and create a VM on the Mac that is an exact copy of the PC, complete with Windows and all the Windows apps that you need. Also if you’re already using Boot Camp, you can even create a VM that duplicates your Boot Camp partition – which is a handy option for quickly checking a few files, or running apps that don’t need top performance, without having to shut the Mac down and boot into Windows.
Remember VMWare is a little more complicated here, as it displays a window with a lot of settings that might seem a bit daunting to first time users. Parallels makes things a bit easier for beginners, by providing a number of predefined options that are suitable for productivity software such as Microsoft Office, or running heavy-duty 3D games, or design software.
Both programs also allow you to change the ‘hardware’ configuration of your VMs if you need to – just as though you were choosing the physical hardware for a real Mac or PC. If your Mac has a multi-core processor – such as the new iMac Pro, which has up to 18 processor cores – then you can devote multiple cores to your VM in order to improve performance. You can also allocate extra memory and disk space, and even increase the amount of video memory that your VM can use for handling 3D graphics in games and other graphics software.
Other options provided by both Parallels and VMWare include the ability to connect external devices, such as a hard drive or even Bluetooth speakers to your Windows VM. You can also determine how your VM interacts with the macOS on your Mac, perhaps sharing specific folders and files that you need for a work project, or sharing your music or photo libraries. A key aspect of how your VM runs on your Mac is the way it appears when it’s running on the Mac desktop.

By default, both Parallels and VMWare run their VMs in a window – so you get a kind of ‘Windows window’ that displays the Windows desktop floating in its own window on top of the Mac desktop. But, it’s also possible to expand the Windows desktop so that it fills the entire screen, making your Mac look just like a normal PC. Also a better option for many people is the ability to hide the Windows desktop altogether, so that individual Windows apps appear all on their own on the Mac desktop, just like ordinary Mac apps.
The number of different options available here can be a bit intimidating, but the great thing about virtualisation technology is that you can’t really break a VM. You can save different versions of your VM – just like saving different versions of a document in Microsoft Word. That allows you to experiment with different settings to see which options work best for you, and then simply revert back to a previous version of the VM whenever you want.
4. Installing Windows with Oracle VirtualBox
For this method first you need to download and install VirtualBox . You can opt for the latest edition by clicking the ‘amd64’ link beside VirtualBox 5.0 for OS X Hosts in the VirtualBox binaries section at the top of the page. Once the disk image has downloaded, locate it on your Mac, mount it and double-click the pkg file to install the application.
You’ll need 175MB of free space on your computer to accommodate it, in addition to the space required by Windows that is up to 32GB. When the installation completes, launch VirtualBox from your Applications folder.
Download your copy of Windows 10 as explained above, and put it somewhere convenient so you can access it from within the VirtualBox installer. Click the New button on the VirtualBox toolbar and give your new virtual machine a name like ‘Windows 10’ and select the operating system you’re installing from the Version drop-down menu and Click Continue.
When Windows is up and running it will behave like a separate computer from the rest of your Mac, which will continue to run macOS. To do this it needs to ‘borrow’ resources from your Mac, which your Mac won’t be able to touch while the virtual machine is running. The most important of these is memory.
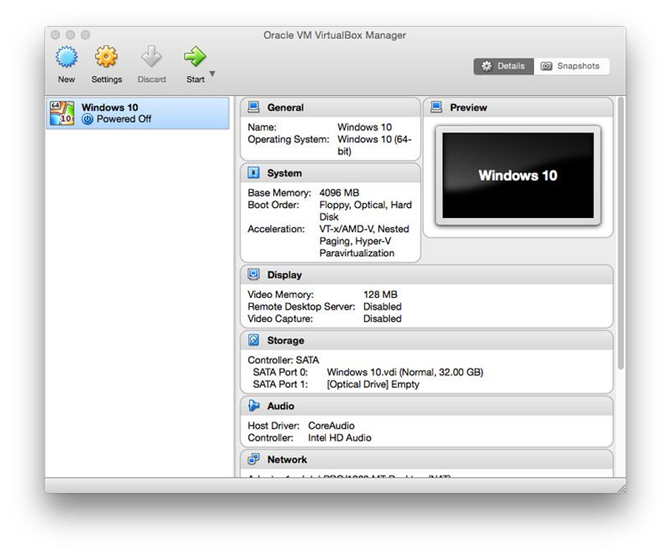
VirtualBox suggests storage capacity and you can also increase this using the slider and then click Continue. When you set up a virtual machine, not only the operating system but also the applications running on it and the files created and edited in it are stored in a bundle, which your Mac will see as a virtual hard drive.
Now you’ll be asked what kind of drive you want to create. Stick with VDI (VirtualBox Disk Image) unless you’re going to use this installation of Windows with a different virtualisation application, such as Parallels Desktop. You’ve now created your new virtual machine – all you need to do now is install Windows on it. VirtualBox new shows you a summary of the composition of your virtual machine, and allows you to switch between different virtualised environments in the sidebar if you’ve set up more than one. Click Start to begin the Windows installation process.
Now locate your installation file where you have stored it and tell the Virtual Box where this is and click the folder icon on the screen that popped up when you clicked Start and select the ISO file on the card. Clicking Open returns you to the set-up screen where you click Start to open the disk image and use it as the installation media.
Once you’ve selected your language the installer needs to know whether you’re upgrading an old version or opting for a Custom install. Pick Custom, as you’re setting up a brand new virtual machine and then, on the following screen, make sure Drive 0 is selected as the installation drive.
The virtual machine will reboot a couple of times during the installation before asking you to set up your preferences. You can opt for Express Settings, which accepts all of Microsoft’s defaults, including using Bing as your search engine, automatically installing updates when they become available, and sending your browsing history to Microsoft.
If you don’t want to do this, click the Customise button and tweak the settings by hand. Next, you need to tell Windows whether the machine belongs to yourself or your organisation. Click Next, then enter your Microsoft account details to log in. If you don’t already have a Microsoft account, click Create one.
The final two steps ask if you’d rather use a PIN that in place of a password, and whether you want to store your files on OneDrive or the local virtual machine. When you’ve decided what you want to do in each instance, Windows reboots one last time before presenting you with the desktop.